
The apex of any software is at deploying it to the client. This process makes the effort of developing the software worth. But a manual deploy could get us crazy!
Most of the deployment processes have a long roadmap to get everything up and running. Don’t even think on forgetting a step, it would cost precious time to find the error and adjust the problem. If you don’t have a roadmap to deploy your software, maybe it’s the first move to take. It’s a step-by-step process that your software needs to finish the deploy. Even though the roadmap is difficult to do manually, any one of the team could follow it, not only the deployment hero.
Good! Having a roadmap means that you know exactly what to do, right? Why don’t automate it and avoid missing any part of this process? Why not configure an automation server to make this in one click? Would it be awesome, isn’t it?
This article won’t solve all your problems like transforming your deployment into a Netflix’s deploy pushing the software to production multiples times a day. Neither solves database migrations problems. The more complex the process, the harder it will be to start. So let’s create an easy plan to make this first step completely possible.
The Automated Deploy Plan
There is no need to use physical servers. It is possible to start this process using your development environment not worrying much about messing any servers’ configuration. So here is the plan:
- Create a virtual machine using Vagrant;
- Configure Jenkins, the Automation Server;
- Configure Jenkins to easily access the virtual machine;
- Deploy a sample App.
Your Virtual Server
To speed up the process of creating a virtual machine (VM), let’s use Vagrant with Virtual Box. You can learn more about Vagrant subscribing to the 3 email quick course. It’s free. Subscribe here. You will also receive weekly tips and tricks about automation.
The main point is to make this first version of your VM be very simple. You ending goal in the future is to transform this machine into the closest environment as possible to production, or to a test environment.
Into an empty folder, create a file named as Vagrantfile and paste the content below.
Vagrant.configure("2") do |config|
  config.vm.box = "hashicorp/precise64"

  config.vm.network "private_network", ip: "192.168.33.10"
  config.vm.synced_folder ".", "/vagrant", type: "rsync"

  config.ssh.insert_key = false

  config.vm.provision "shell", inline: <<-SHELL
    apt-get update -y
    apt-get install default-jdk -y
    apt-get install tomcat7 -y
  SHELL
end
This example will use a default Ubuntu Server from Hashicorp, the creator of Vagrant (search more boxes here).
A private network will be created with the IP 192.168.33.10. This is the address to emulate a real server. The folder synchronization is configured to copy files from host to guest only (your VM). This way avoids any messy in your local environment.
The ssh.insert_key configuration makes this process the easiest. It disables the random Vagrant SSH key generation using the default insecure key. Yes, it is insecure! It is a development test. Security isn’t the priority, at least for now. These keys are available at Vagrant GitHub project.
The provisioning is also very simple, updating the operating system and installing Java and Tomcat from Ubuntu package manager.
To create and start the VM, execute the command vagrant up from the root folder of Vagrantfile file. In a few minutes, the VM will be ready to use. The best part is that you didn’t need to install anything manually. Great!
After finishing the provisioning, check you tomcat installation using the IP configured at Vagrantfile, http://192.168.33.10:8080.
Here are some useful commands to use with Vagrant:
vagrant sshto access the VM by SSH;vagrant haltto shut down the VM;vagrant statusto check the VM status;vagrant destroyto get rid of your VM.
Jenkins Configuration
A Jenkins’ installation with all suggested plugins will only need one extra plugin, Publish Over SSH. If you need some help, check this guide on How to Install a Jenkins’ Plugin in 5 Minutes.
In case of not having Jenkins installation, check this quick series about installing, understanding the suggested plugins and creating your first job. This last article will also help you to configure Maven’s installation if you have not done yet.
Authorize Jenkins to access your server
After restarting Jenkins due to Publish Over SSH plugin installation, it’s time to configure the access to the server. In this didactic example using Vagrant, it will be very simple to do it without the need of creating an SSH key manually.
As said before, at Vagrant GitHub project, there is a private insecure key that will perfectly match the public key inside of the VM. And if you are curious as me, you can check the public key inside the VM using the command below. The result should be the content of Vagrant’s public insecure key.
vagrant ssh -c 'cat ~/.ssh/authorized_keys'
Now, from Jenkin’s home page, access the menu Manage Jenkins and then Configure System. After scrolling down, a new section will be available, the Publish over SSH section.
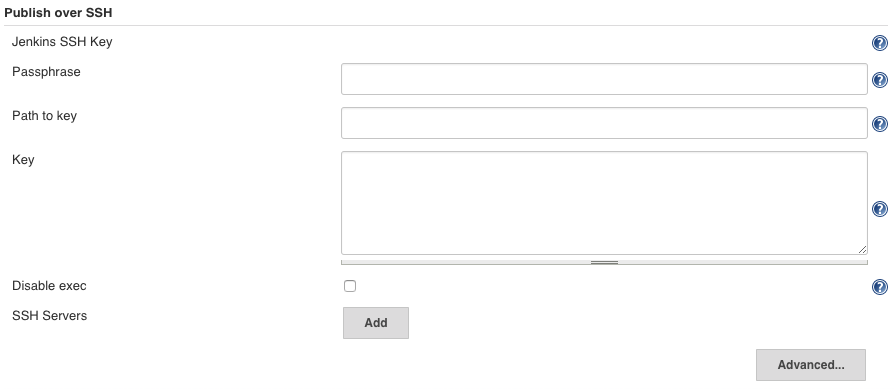
The first step is to copy the private insecure key from Vagrant project and paste at the field Key. This key will be used by Jenkins as the default to access any configured server. In the real world, you should create a specific key to your Jenkins server with a strong passphrase. The extra step would be the copy of the public key to all desired servers. At this example Vagrant already did it for us.
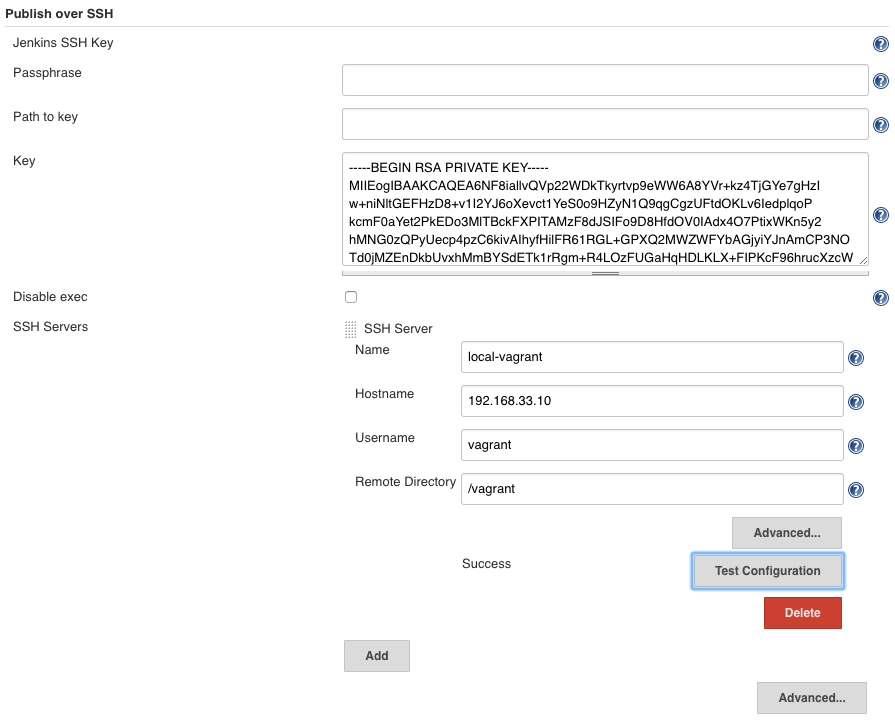
Now click the button Add to start configuring the server connection.
- Name: give a nickname to the server like
local-vagrant; - Hostname: the server IP, in this case, located on Vagrantfile,
192.168.33.10; - Username: the user that will be used in the process,
vagrant; - Remote Directory: the base folder configuration, that must exist, used after connecting to the server. This example will use the Vagrant base folder,
/vagrant.
In the end, your configuration should be like the image below. Before saving the configuration, click on the button Test Configuration. If everything is fine, it will show a Success message.
Don’t forget to have your Vagrant VM up and running otherwise the test will take a little longer to finish due to the timeout configuration. And it will show a connection problem as the image below.
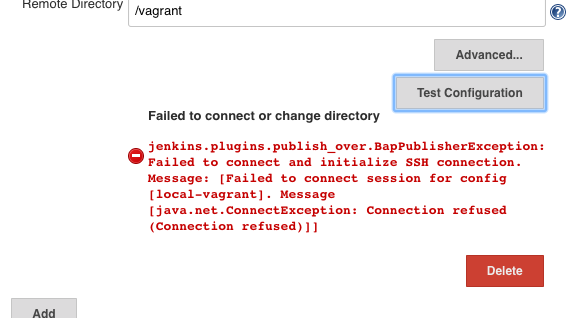
There are other errors related to ssh key, username or even folder problems. All of them will be reported in the same way as the connection problem above.
Deploy Your App
From the Jenkins’ home screen, click on New Item to create the job. Set a name like maven-web-deploy, select the Freestyle Project option and click OK.
Now you are at job configuration’s page. On the section Source Code Management, select Git and fill the Repository URL field with the maven-web sample project, https://github.com/cyborgdeveloper/maven-web.git.
Next, at the Build section, click on Add build step and select the option Invoke top-level Maven targets. Select the preconfigured Maven version (you already did it before on the section about Jenkins Configuration) and set the Goals field as clean package.
At this point, you have reached exactly the same configuration fully explained in the third part of Jenkins’ series. So, if you want deeper details, check the article here.
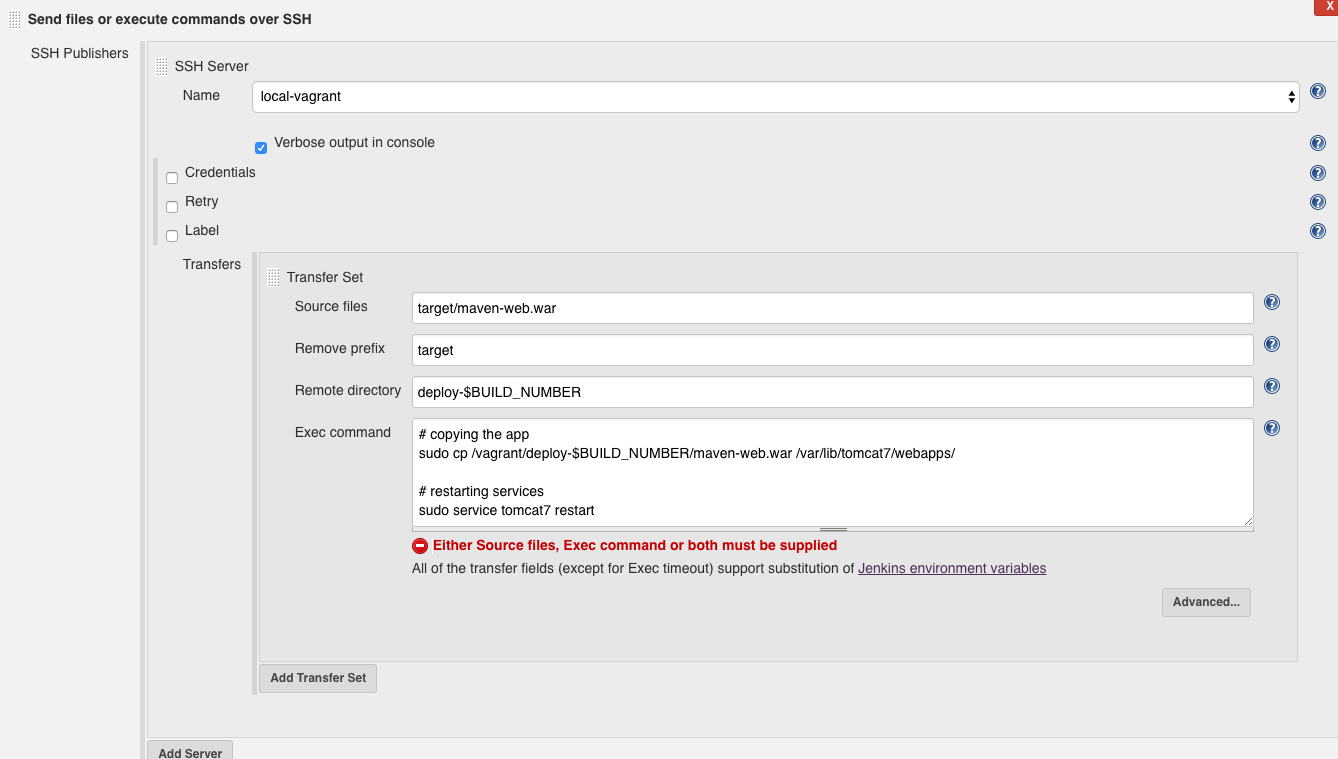
Now that the project is set, let’s configure the deploy. Click again at the button Add build step but this time select the option Send files or execute commands over SSH. Select the SSH Server previously configured, local-vagrant. If you want to watch everything that is happening during the SSH connection, click the Advanced button below checking the option Verbose output in console.
- Source files: set all the source files needed in the process. Taking the job workspace as root, copy the generated
.warfromtarget/maven-web.war. - Remove prefix: removes a common prefix from the source files. Set the value as
targetto remove thetargetfolder from the destination. This field is optional. - Remote directory: defines the folder to send the files. This field is also optional. It uses the root folder from Jenkins configuration about the SSH Server, in this case,
/vagrant. An interesting practice is to configure a specific folder for each deploy likedeploy-$BUILD_NUMBER. In the end, your first build would be located at/vagrant/deploy-1. - Exec command: defines the commands to be executed, basically a SHELL script. This example needs to copy the app to Tomcat Server and then restart the Tomcat service.
# copying the app
sudo cp /vagrant/deploy-$BUILD_NUMBER/maven-web.war /var/lib/tomcat7/webapps/

# restarting services
sudo service tomcat7 restart
Your configuration should be like the image below.
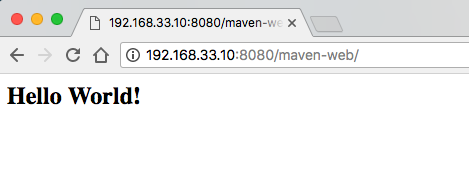
Ready to run the job? Save the configurations and click the button Build Now. If everything works fine you should see a Hello World at http://192.168.33.10:8080/maven-web/.
What Next
Congratulations! You have just finished your first automated deploy! It was an awesome first step to start automating your own deploys.
What is the feeling after deploying an app by a click of a button? I would bet that you are feeling great and happy!
So let’s take the next step. Start applying the same process to your Java project (even in other programming languages, the process is pretty close to this one). Adjust some parts if you don’t have a Maven automatic build, or if you have an SVN project instead of a Git project or changing the Servlet Container to the one that fits best for your project. Write down in the comments session your challenges to apply this first step.
Let’s automate!