It’s time to start you basic automation. Let a robot (Jenkins) do the dirty daily tasks for you so you can increase your productivity.
On the previous parts (1 and 2) were covered the installation and plugins understanding. The objective was to get enough information to feel confident and start this basic automation.
This article will use the Jenkins 2.73.3 version like the previous ones. But this version isn’t the Long-term Support (LTS) anymore. At the time of this writing, the LTS is now at 2.89.1.
What is a job or a project?
Since from the beginning, the description of your configuration that Jenkins would execute was known as job. Nowadays this term is considered as deprecated by Jenkins documentation. The synonym or the best term is project.
Following the same version used by the initial parts of this series and installing all the suggested plugins, Jenkins will provide six types of projects: Freestyle project, Pipeline, Multi-configuration project, Folder, GitHub Organization, Multibranch Pipeline. This article will focus on only one to cover the simplest way to achieve your first basic automation, the Freestyle project.
Access the Jenkins’ home page and click on the link New Item. Think about a name for your project like the most creative one, Hello World. Choose the Freestyle Project and go to the next step clicking OK.
On your next automation, you will notice an extra project type: Copy from. This is a very useful option to copy the entire configuration from another project just changing the name. Start typing in this field to search for all the existing projects. Consequently, you just need to change the parts that you want to.
Getting Started
All right! The first look at a project configuration is a bit scary. There are so many options that maybe you will freeze but don’t. You only need a few of them to start. With time you will gain experience and understand the purpose of each option.
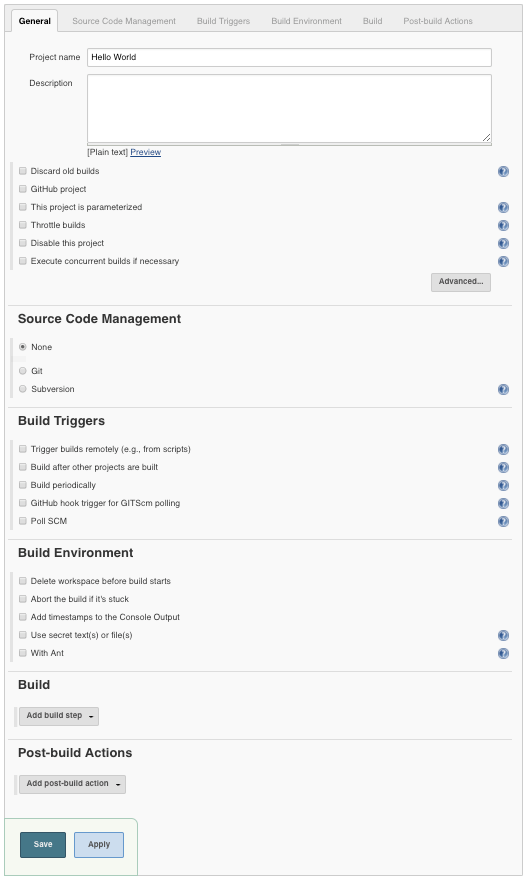
Using the simplest example as it possible, let’s check out a Maven project from GitHub and build it. It could be also a local Git server or a Subversion. To make it happen, there are only two steps to configure.
Source Code Management
This section let you configure the checkout from any SCM. Click the Git option and paste this URL https://github.com/cyborgdeveloper/maven-web on the Repository URL field. Done! Jenkins will make a simple clone of this project.
Build
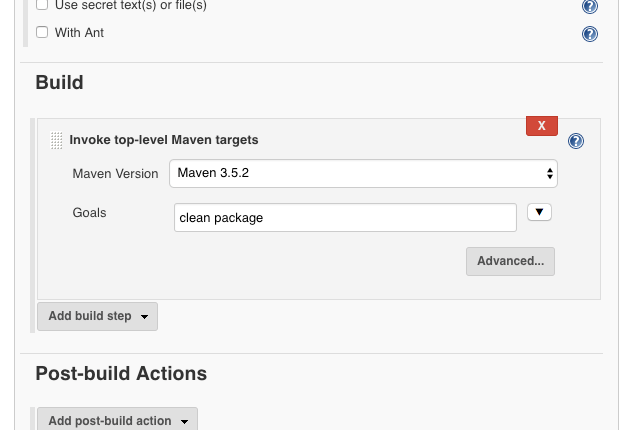
Now it’s time to set Maven commands. Click the button Add build step and select the option Invoke top-level Maven targets. Type in this field the same goals you used to type manually to build your Maven project. This example will clean and package the project. There is no need to type the command mvn at the beginning, just the goals.
clean package
Success?
That’s it! Click on Save to finish the configuration. Jenkins will redirect you to the initial page of your project.
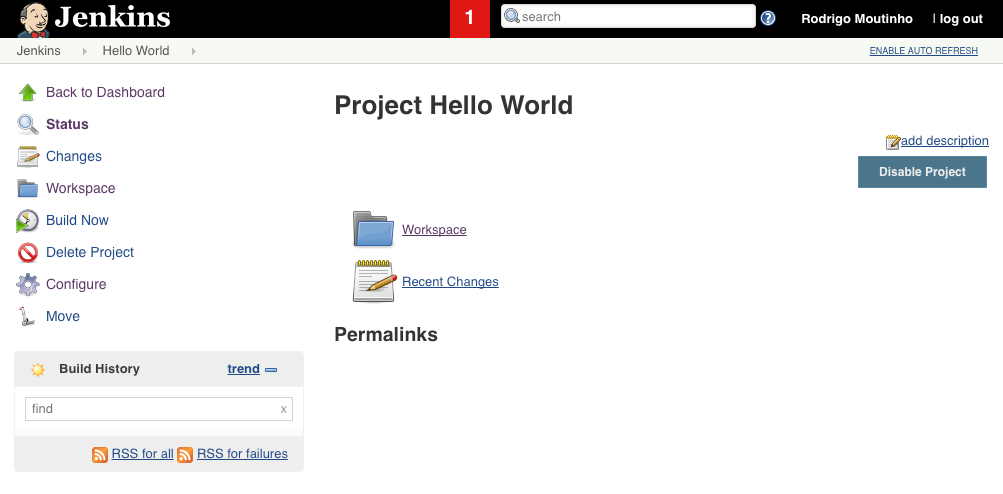
To execute the project, click on Build Now link.
Crack!! Houston we have a problem!
As you may have noticed you got a red ball on your left. Your #1 build crashed! Don’t worry, let’s understand what happened. Knowing how to solve problems is the best skill that you can have.
Console Output
Don’t panic! Every build has a specific page showing everything that happened, just click on the build number link. It will be available the user that started the process, how much time it took and many others great information.
For now, the Console Output link is the best bet to understand what happened. It will show the output of the entire process.
Started by user Rodrigo Moutinho
Building in workspace /var/jenkins_home/workspace/Hello World
 > git rev-parse --is-inside-work-tree # timeout=10
Fetching changes from the remote Git repository
 > git config remote.origin.url https://github.com/cyborgdeveloper/maven-web # timeout=10
Fetching upstream changes from https://github.com/cyborgdeveloper/maven-web
 > git --version # timeout=10
 > git fetch --tags --progress https://github.com/cyborgdeveloper/maven-web +refs/heads/*:refs/remotes/origin/*
 > git rev-parse refs/remotes/origin/master^{commit} # timeout=10
 > git rev-parse refs/remotes/origin/origin/master^{commit} # timeout=10
Checking out Revision f80727fe50c029d347f9a5e7ccdf83bd0c42e6eb (refs/remotes/origin/master)
 > git config core.sparsecheckout # timeout=10
 > git checkout -f f80727fe50c029d347f9a5e7ccdf83bd0c42e6eb
Commit message: "changing maven groupid and adjusting POM informations"
First time build. Skipping changelog.
[Hello World] $ mvn clean package
FATAL: command execution failed
java.io.IOException: error=2, No such file or directory
	at java.lang.UNIXProcess.forkAndExec(Native Method)
	at java.lang.UNIXProcess.<init>(UNIXProcess.java:247)
	at java.lang.ProcessImpl.start(ProcessImpl.java:134)
	at java.lang.ProcessBuilder.start(ProcessBuilder.java:1029)
Caused: java.io.IOException: Cannot run program "mvn" (in directory "/var/jenkins_home/workspace/Hello World"): error=2, No such file or directory
	at java.lang.ProcessBuilder.start(ProcessBuilder.java:1048)
	at hudson.Proc$LocalProc.<init>(Proc.java:249)
	at hudson.Proc$LocalProc.<init>(Proc.java:218)
	at hudson.Launcher$LocalLauncher.launch(Launcher.java:930)
	at hudson.Launcher$ProcStarter.start(Launcher.java:450)
	at hudson.Launcher$ProcStarter.join(Launcher.java:461)
	at hudson.tasks.Maven.perform(Maven.java:367)
	at hudson.tasks.BuildStepMonitor$1.perform(BuildStepMonitor.java:20)
	at hudson.model.AbstractBuild$AbstractBuildExecution.perform(AbstractBuild.java:736)
	at hudson.model.Build$BuildExecution.build(Build.java:206)
	at hudson.model.Build$BuildExecution.doRun(Build.java:163)
	at hudson.model.AbstractBuild$AbstractBuildExecution.run(AbstractBuild.java:496)
	at hudson.model.Run.execute(Run.java:1737)
	at hudson.model.FreeStyleBuild.run(FreeStyleBuild.java:43)
	at hudson.model.ResourceController.execute(ResourceController.java:97)
	at hudson.model.Executor.run(Executor.java:421)
Build step 'Invoke top-level Maven targets' marked build as failure
Finished: FAILURE
Take a close look at the output. Jenkins didn’t find the command mvn. But why?!
It seems that there isn’t Maven installation available. Let’s teach Jenkins how to find it. Access the top menu following this options: Jenkins > Manage Jenkins > Global Tool Configuration.
At this page, you will be able to teach Jenkins where to find the right tools. To simplify, let Jenkins install it automatically. Click on Add Maven, select the desired version giving it a name and Save the configuration.

This automatic installation will store the .m2, the Maven repository folder, on the Jenkins’ home directory downloading everything that your projects need.
Configure
If you try to run the project again you will still get the same error because your project doesn’t know about the new Maven installation yet.
Get back to the Jenkins’ home page, click on Hello World project and access the Configure link. This is the page from where you had started. Now you only need to change the Maven version of your build.
Save and build the project again. Get a cup of coffee because the first time will take a while due to Maven initial downloads. Ok, not too long but it will take a minute or two.
Congratulations!! You just built your first Maven project in an automated way.
Workspace
Last but not least, Jenkins has Workspace concept. Every project has it on Workspace to store their data isolating everything from other projects. You can check all the files obtained from Git in this example clicking on the Workspace link.
What Next
Time to action!! Now that you know the basics, change this example to fit your project. You may use Ant scripts to build or Subversion to store but the concept is the same.
It is a very simple step that could make all the difference to your project automation journey. Small steps will lead you to a completely automated delivery, you just need to trust the process.
It is the end of this series but not the end of your delivery. What is your biggest challenge to starting automating your project today? Your need may be the need of many other developers. Ping me on twitter @rcmoutinho or send me an email by rcmouttinho at cyborgdeveloper dot tech.
The next Jenkins’ articles will focus to solve specific delivery steps that can be applied to any project. Stay tuned and …
Let’s automate!
2 replies to "Jenkins: Getting Started (PART 3)"
Is there article related to build and. run docker container in Jenkins?
Not yet, but indeed it’s a good idea to have. Thanks for the feedback.