
Automation Servers may be seen as complex and too hard to get started. But the basic automation will not take much time to be done.
There are a few key topics that will jumpstart your project automation. The first, how to install Jenkins on any platform. The second, understand the initially suggested plugins to get the best of them. The last but not least, configure your first automation.
Quick History
In mid-2006 or 2007, Kohsuke Kawaguchi founded the project called Hudson. At that time he was working to Sun Microsystems. In a very brief manner, after Sun has been bought by Oracle a little turbulence happened in the community. The end of this history was a fork of the project to GitHub. Previously it was hosted at java.net. This process motivated a project naming change from Hudson to Jenkins, due to Hudson’s naming rights. So if you are searching for Jenkins don’t get surprised if you meet Hudson information.
Nowadays, Hudson project still exists but in a corporate way and not so active. On the other hand, Jenkins is on fire with a high community acceptance and many great features always coming.
One of the key committers of the project is CloudBees. They provide an enterprise version of Jenkins with commercial support. And as Chief Technology Officer (CTO) they have Kohsuke, wise choice.
Installing
As a Java tool, Jenkins only needs Java 8 version pre-installed. Can be the JRE or the JDK. Oracle has a complete guide to install Java in any kind of Operating System, take a look.
At the time of this writing, the Long-term Support (LTS) is at 2.73.3 version. It is delivered every 12 weeks. But they also have a weekly version delivery with bug fixes and latest features which is at 2.91 version.
The download page has multiple types of installations. Let’s pick up the simplest one, the Generic Java Package.
Download the package that has about 70 MB. Open the terminal, access the download file location and execute:
java -jar jenkins.war
That’s it! Access localhost at port 8080 and smile 🙂
You can also add some parameters, like a different initialization port avoiding conflicts:
java -jar jenkins.war --httpPort=8090
Every time you need Jenkins up and running you will need to execute this command. It blocks your current terminal window writing Jenkins’ output log. Press [CTRL + C] to stop it.
Getting Started
You are now on the Unlock Jenkins page. Check your terminal searching for the admin generated password. Here is an output log from a Mac OSX installation.
...
*************************************************************

Jenkins initial setup is required. An admin user has been created and a password generated.
Please use the following password to proceed to installation:

0c699a93011248a980d172eea28de063

This may also be found at: /Users/<your_user_home>/.jenkins/secrets/initialAdminPassword

*************************************************************
...
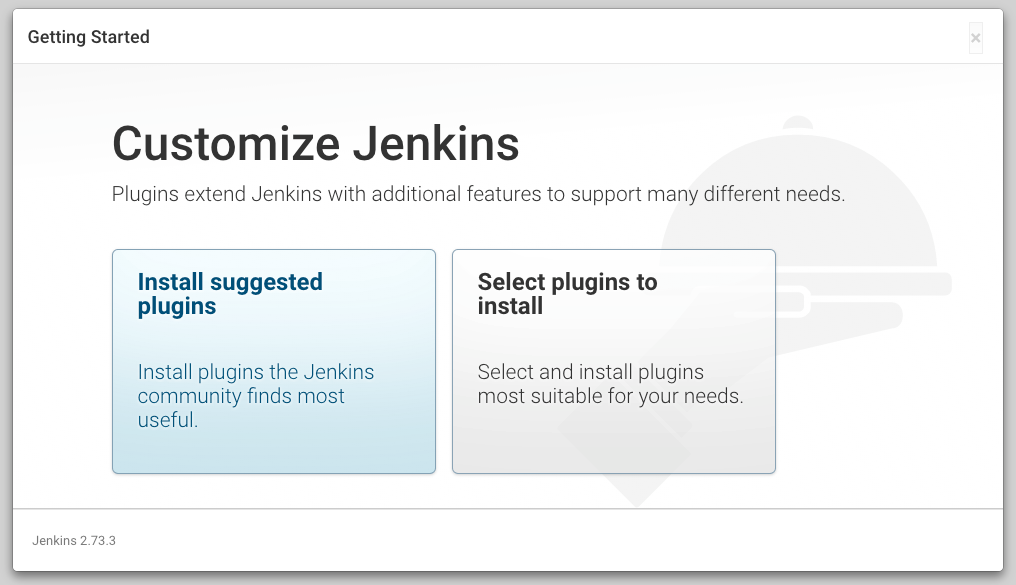
Copy and paste it to proceed installation. Jenkins will suggest the most used plugins, analyzed in details in the next sessions but for now is enough. This step can take a while according to your internet connection.
Then, create your own admin user. It is a good practice considering that Jenkins track your actions. You can also receive custom notification straight to your mail inbox.
It’s ready to use! Welcome to the automation paradise.
Location
This article will not get into details but it is important to know the basics about it.
Consider the Jenkins home directory as a database. It’s very important to take care of it. This folder handles from simple configurations up to your entire automation jobs.
Be aware that it is important to back up these files for your security. In contrast, if you are learning how to use or want to restart your entire Jenkins’ configuration you only need to delete this folder to get rid of everything.
As you may have noticed, on the Generic Java Package installation, the .jenkins folder will be created at the user’s home directory.
/Users/<your_user_home>/.jenkins/...
Docker Installation
This is the only installation that doesn’t require Java pre-installed, only Docker. Run the following command:
docker run \
-p 8080:8080 \
-p 50000:50000 \
-v $(pwd)/jenkins_home:/var/jenkins_home \
jenkins/jenkins:lts
- -p 8080… : The default Jenkins listening port.
- -p 50000… : JNLP port used to connect a slave agent.
- -v… : Explicit volume to store the Jenkins home directory. It will maintain the data even after the container has been stopped or deleted. Note that a folder named
jenkins_homewill be created at your local folder from where this command is running.- $(pwd): Local folder for Unix environments.
- ${PDW}: The same using Windows PowerShell.
- jenkins/… : Tag location at DockerHub to the LTS version. At this moment the 2.73.3 tag would have the same result. If you want the weekly version, don’t specify the version, just type
jenkins/jenkins.
jenkins/jenkins        2.73.3              5f9cc03c136c        2 weeks ago         812MB
jenkins/jenkins        lts                 5f9cc03c136c        2 weeks ago         812MB
Other Installations
In a very simple explanation, all other installations execute the same process as the Generic Package but at the end, a service will be created to ensure Jenkins is up and running even if you restart your machine.
It is up to you to choose the option that fits your scenario best.
Suggested Plugins
One of the main things that put Jenkins as one of the top automation tools in the industry is the plugin flexibilities. Plugins create the perfect scenario to fulfill most of your needs or all of them. Knowing how to get the best of the initially recommended plugins will make all the difference in your automation journey.
Jenkins has an official site to search for plugins where some key information is shown.
- Minimum required version to install.
- Maintainers, the magicians behind the plugin. You can also be a maintainer fixing bugs, writing documentation and suggesting improvements.
- Dependencies, the reason for Jenkins success. Think of a big puzzle using other existing pieces to create a new feature.
- The changelog shows how active this plugin is on fixing bugs and being constantly updated.
The plugin page is the best place to understand how useful the plugin is. From how many installations it has per month, to notes warning that the plugin became obsolete at some point in your lifetime.
Be aware that the initial manual plugin selection will not show the full list but you will be able to add whichever you want using the Plugin Manager after the installation.
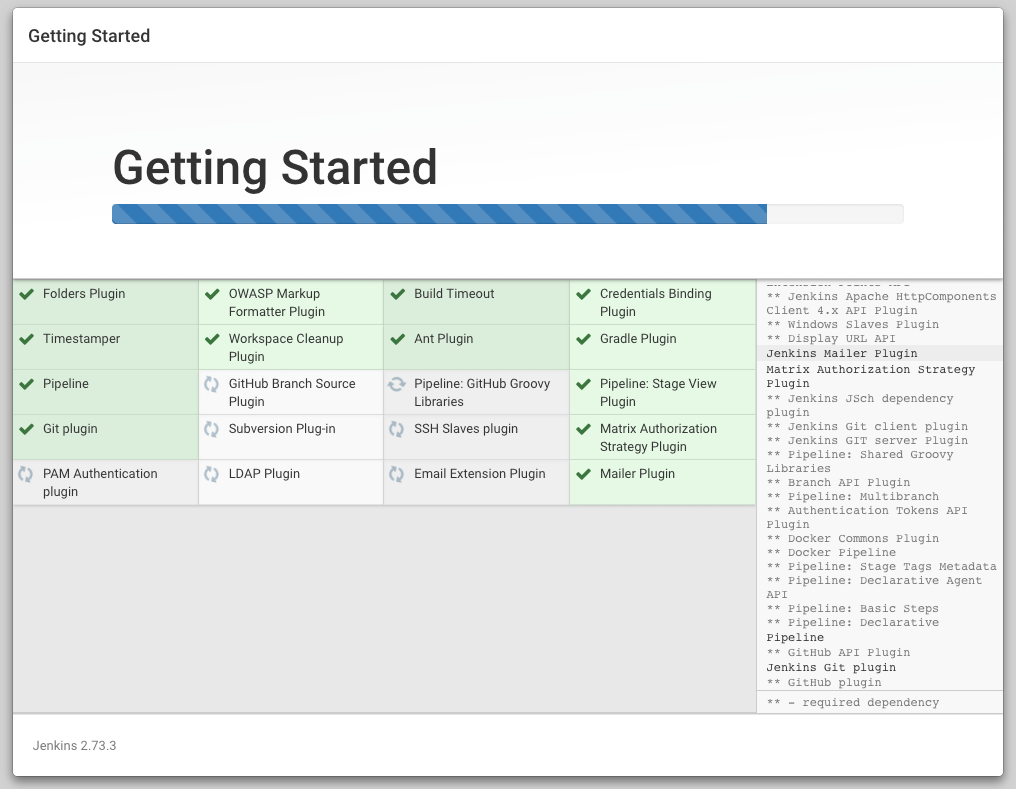
For didactic reasons, let’s cover the same topics used by Suggested Plugins page following the same order as they are suggested. So you will feel confident enough looking at the plugin installation. At the moment of this installation, version 2.73.3, there are 20 recommendations.
Organization and Administration
- Folders: Very useful depending on your project size allowing folder creation to better organize your jobs.
- OWASP Markup Formatter: Allow HTML content at text fields taking care of unsafe tags like scripts. The standard format is plain text. You can change this configuration at
Manage Jenkins > Configure Global Security > Markup Formatter. OWASP = Open Web Application Security Project.
Build Features
- Build Timeout: Abort a build if it’s taking too long to execute. On the job configuration page, check the option
Abort the build if it’s stuckatBuild Environmentsection. - Credentials Binding: An easy way to handle secrets on a job accessing them by an environment variable during the build.
- Timestamper: An option that
add timestamps to the Console Outputat theBuild Environmentsection on a job configuration. - Workspace Cleanup: Like the name says, enables a workspace cleanup before and/or after the build is done.
Other cool ones not suggested:
- Rebuilder: Useful to rebuild parameterized jobs filling with the previously used values.
- SSH Agent: Allows adding Secure Shell (SSH) credentials used on builds.
- embeddable-build-status: This is for the badge lovers. Creates a fixed URL exposing the latest job status with an embeddable build status icon.
Build Tools
This section is very flexible to unmark suggested plugins or mark new ones like .NET or NodeJS support according to your project needs.
- Ant: Adds Apache Ant support allowing to invoke Ant targets at
Buildsection. - Gradle: Adds Gradle support to Jenkins allowing the build to run Gradle scripts.
Build Analysis and Reporting
Nothing is marked as suggested but it is possible to configure Checkstyle, Cobertura, JUnit and many other tools.
Pipelines and Continuous Delivery
- Pipeline: Orchestrate automation workflows regardless its complexity. Check the documentation for more details.
- GitHub Branch Source: Import repositories from an organization or user and expect a
Jenkinsfilein the root directory of the project or branch. - Pipeline: GitHub Groovy Libraries: Allows Pipeline Groovy libraries to be loaded on the fly from GitHub.
- Pipeline: Stage View: A pretty view to see the progress of each stage.
Another useful plugin not suggested is Copy Artifact. It enables a build step to copy an artifact from other projects (jobs).
Source Code Management
This section basically handles the checkout of your project from various Source Control Management (SCM) like Bitbucket, GitHub, GitLab, and even the old CVS. Jenkins suggests only Git and Apache Subversion initially.
Distributed Builds
This is a more advanced section when the basics of Jenkins is not enough to your project. SSH Slaves is suggested to access a slave using SSH with Java implementation. And an even more specific that is not suggested is the Windows Slaves that allows connecting to Windows machines.
User Management and Security
- Matrix Authorization Strategy: Enables a deep security level control to the Jenkins administrator of each available task. Allows enabling, disabling, and configuring key features of Jenkins.
- PAM Authentication: Adds the Pluggable Authentication Module (PAM) support. “It is a mechanism to integrate multiple low-level authentication schemes into a high-level application programming interface (API)” – (Wikipedia).
- LDAP: Adds the Lightweight Directory Access Protocol (LDAP) support, a standard application protocol for accessing directories over the Internet.
Another great plugin not suggested is Role-based Authorization Strategy. It is very useful for companies that handle the access by levels of roles.
Notifications and Publishing
Email Extension and Mailer improve in many aspects Jenkins email notification like customizing triggers and body mail content.
The plugins Publish Over SSH and SSH are not suggested but they also help to copy files and to execute scripts over SSH protocol.
Manage Plugins
It’s time to take a ride on Plugin Manager to look and improve your Jenkins plugins. Access this page using the menu Manage Jenkins > Manage Plugins. From there you will be able to update, install and check what is already installed. You will also notice that there are more than the twenty suggested plugins installed due to their needed dependencies.
Configure your Automation
It’s time to start your basic automation. Let a robot (Jenkins) do the dirty daily tasks for you so you can increase your productivity. By this time you have enough information about how to install and understand initial plugins having the confidence to create your first job.
What is a job or a project?
Since from the beginning, the description of your configuration that Jenkins would execute was known as job. Nowadays this term is considered as deprecated by Jenkins documentation. The synonym or the best term is project.
Following the same version used by the initial parts of this series and installing all the suggested plugins, Jenkins will provide six types of projects: Freestyle project, Pipeline, Multi-configuration project, Folder, GitHub Organization, Multibranch Pipeline. This article will focus on only one to cover the simplest way to achieve your first basic automation, the Freestyle project.
Access the Jenkins’ home page and click on the link New Item. Think about a name for your project like the most creative one, Hello World. Choose the Freestyle Project and go to the next step clicking OK.
On your next automation, you will notice an extra project type: Copy from. This is a very useful option to copy the entire configuration from another project just changing the name. Start typing in this field to search for all the existing projects. Consequently, you just need to change the parts that you want to.
Getting Started
All right! The first look at a project configuration is a bit scary. There are so many options that maybe you will freeze but don’t. You only need a few of them to start. With time you will gain experience and understand the purpose of each option.
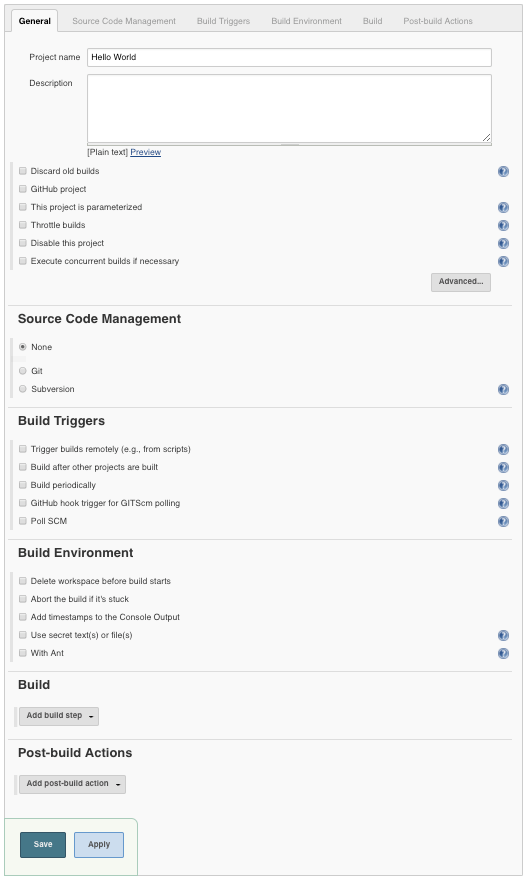
Using the simplest example as it possible, let’s check out a Maven project from GitHub and build it. It could be also a local Git server or a Subversion. To make it happen, there are only two steps to configure.
Source Code Management
This section let you configure the checkout from any SCM. Click the Git option and paste this URL https://github.com/cyborgdeveloper/maven-web on the Repository URL field. Done! Jenkins will make a simple clone of this project.
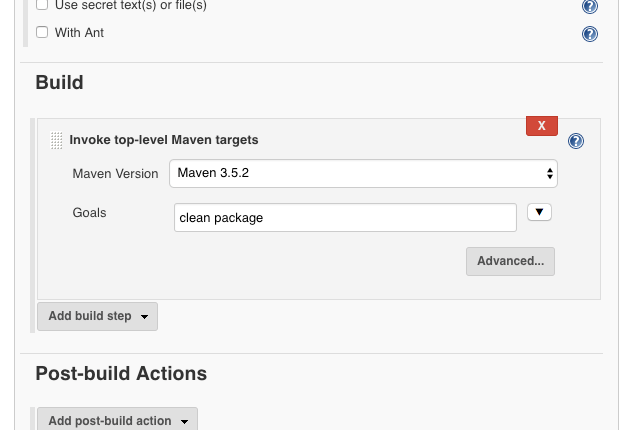
Build
Now it’s time to set Maven commands. Click the button Add build step and select the option Invoke top-level Maven targets. Type in this field the same goals you used to type manually to build your Maven project. This example will clean and package the project. There is no need to type the command mvn at the beginning, just the goals.
clean package
Success?
That’s it! Click on Save to finish the configuration. Jenkins will redirect you to the initial page of your project.
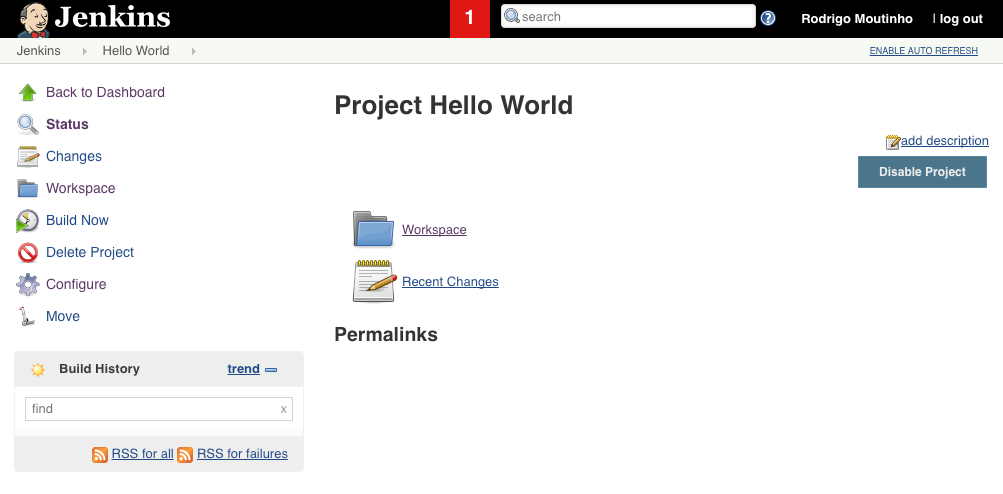
To execute the project, click on Build Now link.
Crack!! Houston we have a problem!
As you may have noticed you got a red ball on your left. Your #1 build crashed! Don’t worry, let’s understand what happened. Knowing how to solve problems is the best skill that you can have.
Console Output
Don’t panic! Every build has a specific page showing everything that happened, just click on the build number link. It will be available the user that started the process, how much time it took and many others great information.
For now, the Console Output link is the best bet to understand what happened. It will show the output of the entire process.
Started by user Rodrigo Moutinho
Building in workspace /var/jenkins_home/workspace/Hello World
 > git rev-parse --is-inside-work-tree # timeout=10
Fetching changes from the remote Git repository
 > git config remote.origin.url https://github.com/cyborgdeveloper/maven-web # timeout=10
Fetching upstream changes from https://github.com/cyborgdeveloper/maven-web
 > git --version # timeout=10
 > git fetch --tags --progress https://github.com/cyborgdeveloper/maven-web +refs/heads/*:refs/remotes/origin/*
 > git rev-parse refs/remotes/origin/master^{commit} # timeout=10
 > git rev-parse refs/remotes/origin/origin/master^{commit} # timeout=10
Checking out Revision f80727fe50c029d347f9a5e7ccdf83bd0c42e6eb (refs/remotes/origin/master)
 > git config core.sparsecheckout # timeout=10
 > git checkout -f f80727fe50c029d347f9a5e7ccdf83bd0c42e6eb
Commit message: "changing maven groupid and adjusting POM informations"
First time build. Skipping changelog.
[Hello World] $ mvn clean package
FATAL: command execution failed
java.io.IOException: error=2, No such file or directory
	at java.lang.UNIXProcess.forkAndExec(Native Method)
	at java.lang.UNIXProcess.<init>(UNIXProcess.java:247)
	at java.lang.ProcessImpl.start(ProcessImpl.java:134)
	at java.lang.ProcessBuilder.start(ProcessBuilder.java:1029)
Caused: java.io.IOException: Cannot run program "mvn" (in directory "/var/jenkins_home/workspace/Hello World"): error=2, No such file or directory
	at java.lang.ProcessBuilder.start(ProcessBuilder.java:1048)
	at hudson.Proc$LocalProc.<init>(Proc.java:249)
	at hudson.Proc$LocalProc.<init>(Proc.java:218)
	at hudson.Launcher$LocalLauncher.launch(Launcher.java:930)
	at hudson.Launcher$ProcStarter.start(Launcher.java:450)
	at hudson.Launcher$ProcStarter.join(Launcher.java:461)
	at hudson.tasks.Maven.perform(Maven.java:367)
	at hudson.tasks.BuildStepMonitor$1.perform(BuildStepMonitor.java:20)
	at hudson.model.AbstractBuild$AbstractBuildExecution.perform(AbstractBuild.java:736)
	at hudson.model.Build$BuildExecution.build(Build.java:206)
	at hudson.model.Build$BuildExecution.doRun(Build.java:163)
	at hudson.model.AbstractBuild$AbstractBuildExecution.run(AbstractBuild.java:496)
	at hudson.model.Run.execute(Run.java:1737)
	at hudson.model.FreeStyleBuild.run(FreeStyleBuild.java:43)
	at hudson.model.ResourceController.execute(ResourceController.java:97)
	at hudson.model.Executor.run(Executor.java:421)
Build step 'Invoke top-level Maven targets' marked build as failure
Finished: FAILURE
Take a close look at the output. Jenkins didn’t find the command mvn. But why?!
It seems that there isn’t Maven installation available. Let’s teach Jenkins how to find it. Access the top menu following this options: Jenkins > Manage Jenkins > Global Tool Configuration.
At this page, you will be able to teach Jenkins where to find the right tools. To simplify, let Jenkins install it automatically. Click on Add Maven, select the desired version giving it a name and Save the configuration.

This automatic installation will store the .m2, the Maven repository folder, on the Jenkins’ home directory downloading everything that your projects need.
Configure
If you try to run the project again you will still get the same error because your project doesn’t know about the new Maven installation yet.
Get back to the Jenkins’ home page, click on Hello World project and access the Configure link. This is the page from where you had started. Now you only need to change the Maven version of your build.
Save and build the project again. Get a cup of coffee because the first time will take a while due to Maven initial downloads. Ok, not too long but it will take a minute or two.
Congratulations!! You just built your first Maven project in an automated way.
Workspace
Last but not least, Jenkins has Workspace concept. Every project has it on Workspace to store their data isolating everything from other projects. You can check all the files obtained from Git in this example clicking on the Workspace link.
What Next
Time to action!! Now that you know the basics, change this example to fit your project. You may use Ant scripts to build or Subversion to store but the concept is the same.
It is a very simple step that could make all the difference to your project automation journey. Small steps will lead you to a completely automated delivery, you just need to trust the process.
This is just the starting of your delivery automated process. What is your biggest challenge to starting automating your project today? Write down in the comments section below. Your need may be the need of many other developers.
Let’s automate!
2 replies to "Getting Started with Jenkins: The Ultimate Guide"
Do you have any video of that? I’d love to
find out more details.
Thank you for your feedback.
I will create videos to show the whole process and send to the list.
Make sure you have already subscribed to receive it.